The Ferrari meets JayData
Good morning, good afternoon, good evening to you.
Welcome back to a new episode in the Ferrari series. For those of you who remember what I call the Ferrari read on; all other please make yourself familiar with Part 1 and Part 2 in this series before moving on.
In Part 2 we ended up with a HTML5 app that shows a nice metro style tile view of SharePoint lists and libraries. This time we want to enhance the solutions so that it retrieves items through SharePoint’s OData service. Sorry SP2007 we’ve to leave you behind as this service was first introduced in SP2010. Don’t worry too much though; using REST is forward thinking as SP2013 will expose a whole new REST API that will greatly expanding the existing capabilities.
In the simplest form you could make XHR calls to the service endpoint at _vti_bin/listdata.svc, but we’re not going down that route. Instead we’re using JayData for doing the heavy lifting. While being relatively new to the market JayData brings an astonishing range of capabilities to the table, one of them is the abstracting of underlying storage provider. Yes, you heard me right; OData is just one of the supported storage provider, see JayData provider for a full list. Once you learned a little bit about JSLQ the JavaScript Query Language you will (probably) never go back talking to any storage provider on your own.
After settling on JayData the next choice is about a client framework that helps us building our dynamic UI. JayData comes with a bunch of modules that offers integration into various third party frameworks and knockout is one of them. A word of warning take everything that you see me doing with knockout with some grain of salt, as I haven’t worked with it before. The last piece of software that I want to bring to the table is of course RequireJS. We are going to build a JavaScript app and based on my experience there’s simply no way of writing one without it.
So without further hassle we are now going to build a pretty straight forward three tier navigation, which BTW will align us nicely with the Metro-style design guides; and nah, we won’t do Metro style left <-> right scrolling, this is still a web app not Window 8 Metro ;-). For the eager of you here are the links to the live demos:
First tier: Entry screen consists of a Tile View (green) and a Login View (yellow). The whole page can be served anonymously, but in order to see the next tier you’ve to log on. You probably heard me saying that before “SharePoint OData service won’t work anonymously”.
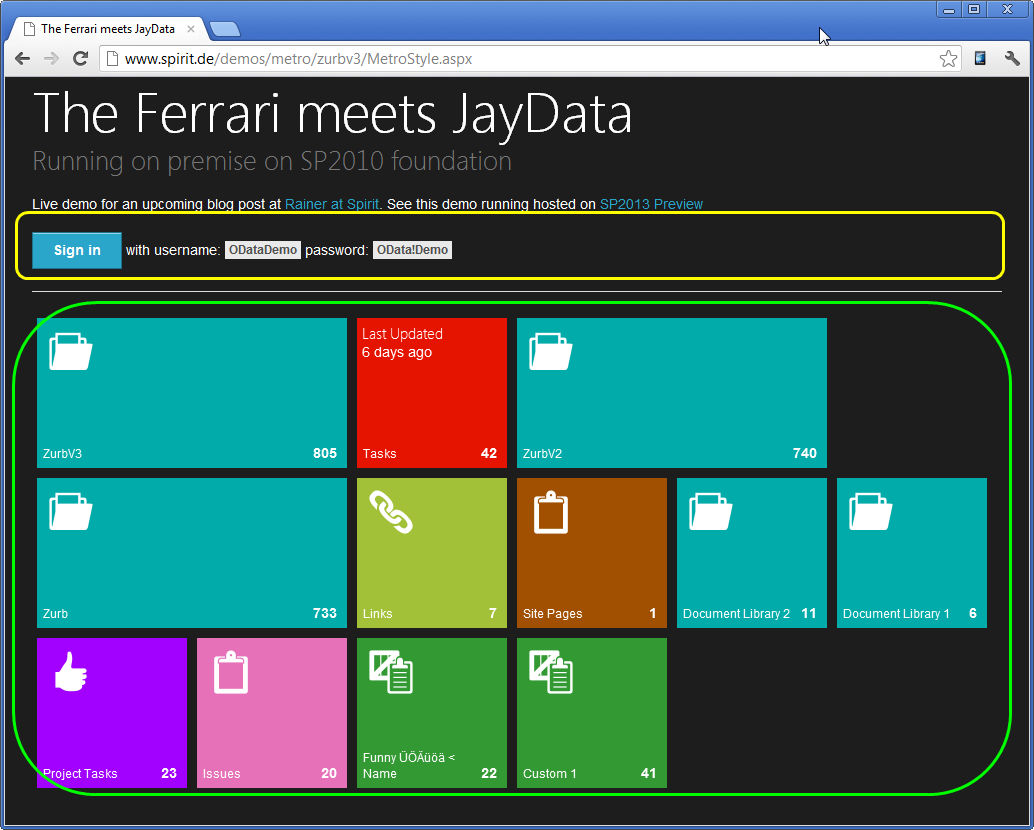
The following HTML is used as by Knockout to produce the Tile View.
 1 <div class="row" id="tileVM">
 2     <div class="twelve columns tiles"
 3          data-bind="foreach: TileData, updateTilesOnce: true">
 4         <div class="live-tile" data-stops="100%" data-speed="750" data-delay="-1"
 5              data-bind="class: color + ' ' + size,
 6                         attr: {'data-mode': mode ? mode : '', 'data-direction': direction} ,
 7                         click: $root.goToDetail">
 8             <span class="tile-title" data-bind="text: title"></span>
 9             <span class="badge" data-bind="text: count"></span>
10
11             <div>
12                 <img class="micon" data-bind="attr: {src: icon}"/>
13             </div>
14             <div>
15                 <h3 data-bind="text: backTitle"></h3>
16                 <span class="prettyDate" data-bind="attr: {title: prettyDate}"></span>
17             </div>
18         </div>
19     </div>
20 </div>
And here’s the TileViewModel as RequireJS module leveraging the revealing module pattern. I’ve seen John Papa mentioning this pattern more than once. BTW feel free to provide feedback about your favorite way to structure knockout apps.
 1 define (['knockout', 'helper'], function ( ko, fn ) {
 2     "use strict";
 3
 4     return function () {
 5         // ko observables
 6         var userId = ko.observable ().subscribeTo ('userId'),
 7             selectedList = ko.observable ().subscribeTo ('selectedList'),
 8             TileData = ko.observableArray ([]),
 9         // functions
10             goToDetail;
11
12         // end of var declaration
13
14         goToDetail = function ( tile, event ) {
15             if ( userId () !== 'anonymous' ) {
16
17                 selectedList (fn.cleanup (tile.title));
18                 location.hash = '/view/' + selectedList ();
19             }
20             else {
21                 alert (' Make sure to log on.');
22             }
23         };
24
25         // Bootstrap
26         TileData (app.tilesData.tiles.tile);
27
28
29         // Return public methods
30         return{
31             userId : userId,
32             TileData : TileData,
33             goToDetail : goToDetail
34         };
35     };
36 });
Our trusted DVWP produces the required app.tilesData.tiles.tile array that is used to bootstrap the TileData observableArray. I’m not going to cover the required XSLT here as this is just a variation what we did in Part 2, but if you want to deep dive again take a look at this gist DVWP’s settings and XSLT.
Here’s the HTML for the login area and the related LogonViewModel.
1 <div id="logonVM">
2 <div data-bind="visible: userId() !== 'anonymous' " style="display: none;">
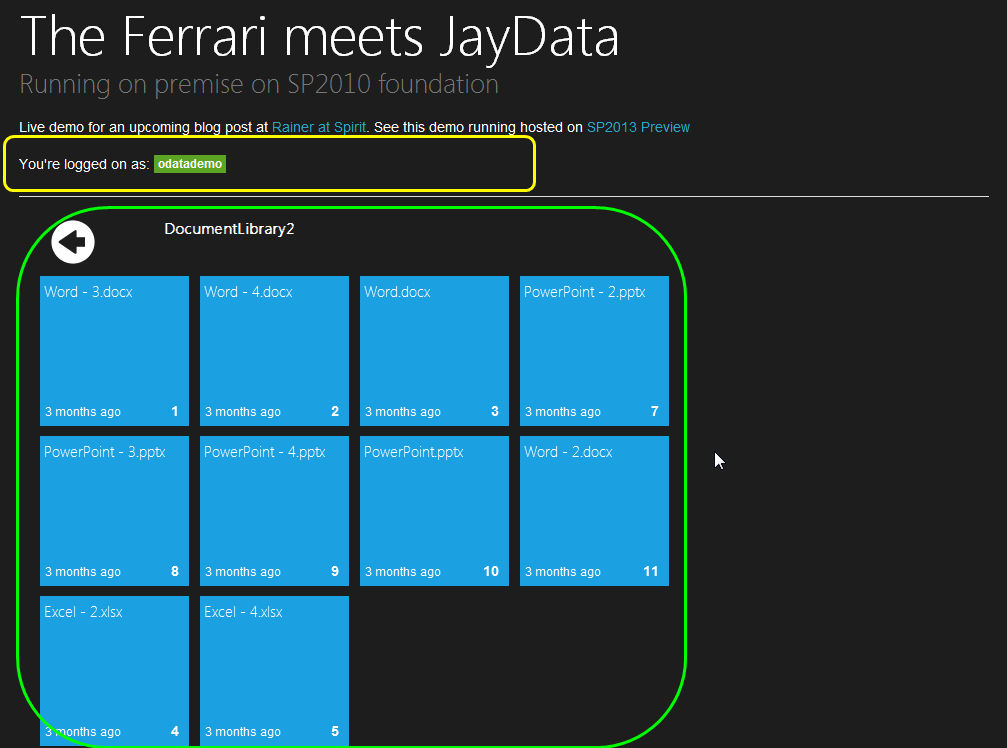
3 You're logged on as: <span class="success label" data-bind="text: userId"></span>
4 </div>
5 <div data-bind="visible: userId() === 'anonymous' " style="display: none;">
6 <a href="#" data-bind="attr: {href: loginURL}" class="button"> Sign
7 in</a>
8 with username: <span class="secondary label">ODataDemo</span> password: <span class="secondary label">OData!Demo</span>
9 </div>
10 </div>
 1 define (['knockout'], function ( ko ) {
 2     "use strict";
 3
 4     return function () {
 5         var userId = ko.observable (app.configMap.userId).publishOn ('userId'),
 6             loginURL;
 7
 8         loginURL = ko.computed (function () {
 9             return '../_layouts/Authenticate.aspx?Source=' + encodeURIComponent (location.pathname) + location.hash;
10         });
11
12         // Return public methods
13         return {
14             userId : userId,
15             loginURL : loginURL
16         }
17     }
18 });
Second tier: The Login View (yellow) will show your username once you’re logged in and by clicking on one of the tiles you’ll see 10 items of the chosen list or library. Bear in mind that this is a demo, but adding paging, sorting and filtering per data source in the UI would be a pretty straight forward as they are already implemented in the ListingViewModel.
Third tier: By clicking on one of the level 2 tiles you’ll see the full detail information on the right. One of the benefits of working with OData is that is allows you to get multiple related information in single call, which greatly simplifies your life as client side app developer.
From the OData website
A URI with a $expand System Query Option indicates that Entries associated with the Entry or Collection of Entries identified by the Resource Path section of the URI must be represented inline (i.e. eagerly loaded). For example, if you want to identify a category and its products, you could use two URIs (and execute two requests), one for /Categories(1) and one for /Categories(1)/Products. The ‘$expand’ option allows you to identify related Entries with a single URI such that a graph of Entries could be retrieved with a single HTTP request.
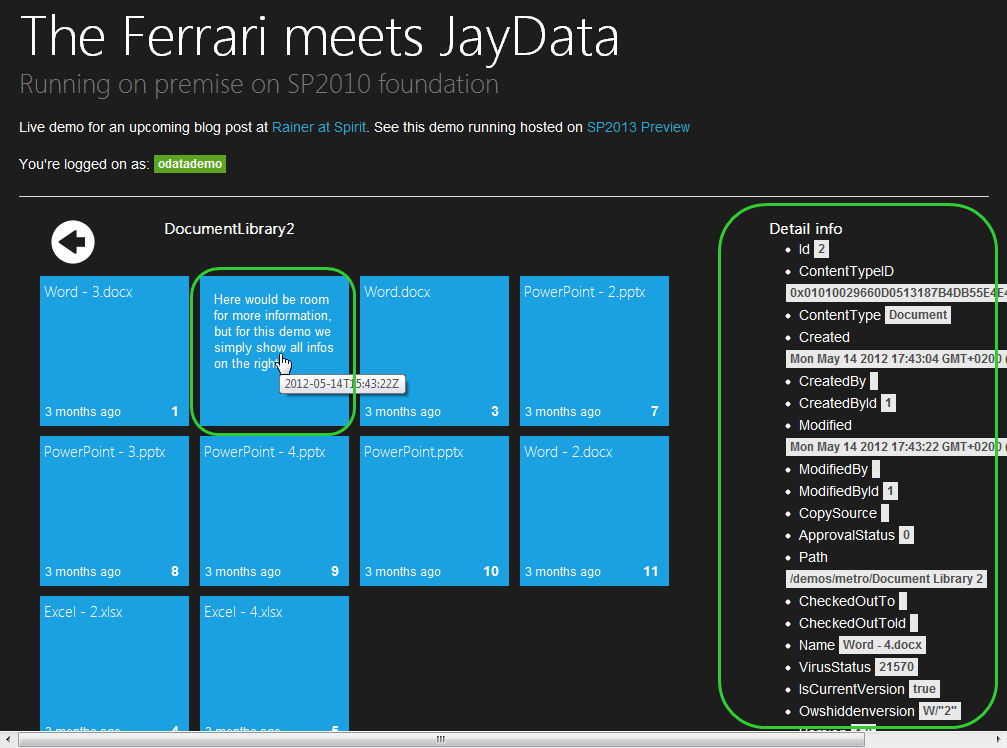
For this demo I haven’t separated the Listing and the Detail view and the Detail view is just an un-styled list of properties for the current item. For a larger application it would probably make sense to separate the views and work the detail view a little bit out ;-).
To see the full html and JS that is involved take a look at this gist, I’m going to concentrate on the parts that deal with the JayData configuration here.
But before we can do that, we need to take quick look how all the various VMs are integrated by RequireJS. As in almost every standard RequireJS app there’s a main.js file that allows you to configure various aspects and then kick off your app.
 1 require.config({
 2    //By default load any module IDs from js/lib
 3     baseUrl : 'libs',
 4     paths : {
 5        // Try loading from CDN first
 6        ...
 7
 8 require(['app'], function (app) {
 9     // we can safely kick of the app even before document.ready
10     app.init();
11 });
Within app.js we define dependencies on the various VMs that you’ve seen earlier and within the init method we use ko.applyBindings() to bind them to the corresponding element in the DOM. As said I’m new to knockout, so I leave it to the experts if that’s a recommend pattern or not. At least it’s working, so it can’t be totally wrong ;-). Path.js is used as a light alternative to sammy.js in order to setup some URL rules. As you can see Ryan Niemeyer’s excellent postbox -a native ko pubsub sytem- is used to notify subscribers whenever changes occur.
 1 define (['jquery', 'knockout', 'LogonVM', 'TileVM', 'ListingVM', 'postbox', 'path', 'appData', 'kocBH' ],
 2     function ( $, ko, LogonVM, TileVM, ListingVM, postbox ) {
 3         "use strict";
 4
 5         var init = function () {
 6
 7             // Exposing ko as global
 8             window.ko = window.ko || ko;
 9             var $tileContainer = $ ('#tileVM');
10
11             // Configuring JayData to use current site's Odata service
12             app.context = new app.MetroStyleDataContext ({ name : 'oData', oDataServiceHost : '../_vti_bin/listdata.svc' });
13
14             // binding ko to the appropriate container
15             ko.applyBindings (new TileVM (), document.getElementById ('tileVM'));
16             ko.applyBindings (new LogonVM (), document.getElementById ('logonVM'));
17             ko.applyBindings (new ListingVM (), document.getElementById ('listingVM'));
18
19             // Client-side routes. Path exposed as global via shim configuration
20             function toggleTiles() {
21                 var isVisible = $tileContainer.css ('display') === 'block';
22                 isVisible ? $tileContainer.slideUp (300) : $tileContainer.slideDown (300);
23             }
24
25             Path.map ("#/view/:list").to (function () {
26                 postbox.publish ('selectedList', this.params.list);
27             }).enter (toggleTiles);
28
29             Path.map ("(#)").to (function () {
30                 postbox.publish ('selectedList', '');
31             }).enter (toggleTiles);
32
33             Path.listen ();
34         };
35
36         return {
37             init : init
38         }
39
40     });
Boy, Rainer! All those talk about RequireJS and knockout basics. I’m already familiar with it, so where’s the beef? You promised to tell us about JayData, didn’t you?
Yes I did and here you go.
Part 1: Retrieving ListingView date via OData service.
 1  postbox.subscribe ("selectedList", function ( newValue ) {
 2     if ( app.configMap.userId === 'anonymous' ) {
 3         return alert ('Make sure to log on.');
 4     }
 5     if ( newValue !== '' ) {
 6         // Clean out existing itemDetail
 7         itemDetail ([]);
 8         var base = app.context[newValue],
 9             myBase = _.extend ({}, base),
10             sortExp = 'it.' + orderBy ();
11
12         if ( orderAsc () ) {
13             _.extend (myBase, myBase.orderBy (sortExp));
14         }
15         else {
16             _.extend (myBase, myBase.orderByDescending (sortExp));
17         }
18         _.each (includeArray (), function ( inc ) {
19             _.extend (myBase, myBase.include (inc));
20         });
21         myBase.map (chooseMap (newValue))
22             .take (take ())
23             .toArray (allItems);
24     }
25     else {
26         // Clean out existing allItems
27         allItems ([]);
28         // Clean out existing itemDetail
29         itemDetail ([]);
30     }
31 });
Within ListingViewModel.js you find the above postbox.subscriber that listen to any change in the selectedList channel. After checking if there’s a non empty value and that the user is already logged in JayData takes over.
-
app.contextknows about all lists and libraries, so here we usebaseto select a specific onevar base = app.context[newValue] -
orderBy()ororderByDescending()are using the default sorting criteria . This can be modified during runtime by updating theOrderAscandOrderByobservables. -
include()in OData terms maps to the OData$expandverb. Default settings here areCreatedByandModifiedBy. There’s aincludeArray()observabelArray that is used to store the ones you’re interested in. -
map()mapping or projection is another important feature that allows you to select specific fields instead of retrieving all information. ThechooseMap()method is used to retrieve a small set of fields based on their availability e.g.Titlevs.NamevsURL. -
take()allows you to restrict the number of items returned by the system. Again a observable is used to store the default. -
toArray()and finally this method is used to update theallItemsobservableArray. For those of you that are curious how that works under the cover, take a look at the following blog post.
Part 2: Retrieving the Detail View data for a selected item.
 1  showDetails = function (currItem) {
 2     var currentList = selectedList();
 3
 4     app.context[currentList]
 5         .single(function (item) {
 6             return item.Id == this.Id
 7         },
 8         {Id : currItem.Id},
 9         function (item) {
10             var keyValue = [];
11             _.each(item.toJSON(), function (val, key) {
12                 keyValue.push({"key" : key, "val" : val});
13             });
14             itemDetail([]);
15             ko.utils.arrayPushAll(itemDetail(), keyValue);
16             itemDetail.valueHasMutated();
17         });
18 };
Come on, that’s almost too easy isn’t it? This time we’re using JSLQ`s .single method to retrieve ONE item based on a unique criteria, here the currItem.Id. Whenever the system returns the information it’s converted to JSON. Underscore’s each method allows us to push the returned key/value pairs into the keyValue array. Whenever done we use ko.utils.arrayPushAll to update the itemDetails() observable and valueHasMutated() to notify it about the changes.
As you can see, we haven’t dealt a bit with the native OData protocol and when you take a look at what’s going over the wire you’ll be surprised how complex it can get. But luckily that is of no concern for us any longer as we only have to deal with JSLQ.
That’s it for today, but before you ask I wanna cover two questions that I feel coming up:
Would you choose JayData for another project?
That’s a clear YES. JayData is something that’s better than sliced bread. Luckily it’s already invented.
Would you choose knockout for another project?
Yes… most likely. After reading some of the stuff over at the knockout site itself, but more important over at Ryan Niemeyer’s blog, I found it pretty straight forward to work with. By being the only overall framework that JayData supports as module at the moment, it’s the natural choice for the time being. With that said, there are already Sencha and Titanium modules out there, so maybe there’s a JayData backbone module one day… at that point feel free to ask me that question again.
One last thing, you can find the code for the 2010 demo site on github. You have to update the appdata.js in order to work in your environment. Checkout this post that guides you through the required steps with JaySvcUtil.