SharePoint DVWP: from workhorse to Ferrari in 7 steps
This is going to be intense and this is going to be fun…, if you are willing to follow till the end. I’m going to take the good old Data Form Web Part, better known as DVWP, and turn the standard HTML, which is delivered by this reliable workhorse, in some highly optimized HTML5 code: I call it the Ferrari version.
But before we even start, here are some prerequisites:
- you worked with the DVWP before
- you’re familiar with XML/XSLT
- you know who Marc D Anderson is and know his posts about the DVWP inside out
- you are familiar with SharePoint Designer, but you are not afraid using a text editor. Notepad will do, but some kind of syntax checking and highlighting would be beneficial. Before you ask: I’m using WebStorm for overall web development and Altova XML Spy for complex XML/XSLT.
Let’s get started with something the DVWP was build for:
- accessing data via a data source
- (just to recap: Database, SOAP, REST, XML Files and Linked Data source are supported)
- converting the data using XSLT
- and finally display the result as part of a SharePoint page.
Go ahead and:
- create a new site using the blank site template
- create a document library called
servicefilesthat is used to store our pages - create a subfolder
servicefiles/xml - and finally create a
helloworld.xmlfile with the following content
1 <?xml version="1.0" encoding="utf-8" ?>
2 <root>
3 	<title>Hello World</title>
4 </root>
Nothing fancy so far, so let’s move on:
- Let’s created a XML data source for this file
- create a web part page called
WebPartPage.aspx - Place a DVWP on it show us the standard content.
Checkpoint: As said, I assume that you know the DVWP inside out. But if not or you’d prefer not following along right now, don’t worry. Each of the steps below can be accessed online, so sit back, relax and enjoy the ride. If you wanna get your hands dirty later, you find the source code at github.
Ok, let’s move on. By default SPD uses some baked in XSLT to perform the XML/XSLT conversion, which is clearly not the best starting point for us, so let’s replace the xsl:stylesheet by our own.
1 <xsl:stylesheet version="1.0" exclude-result-prefixes="xsl msxsl ddwrt" xmlns:ddwrt="http://schemas.microsoft.com/WebParts/v2/DataView/runtime" xmlns:asp="http://schemas.microsoft.com/ASPNET/20" xmlns:__designer="http://schemas.microsoft.com/WebParts/v2/DataView/designer" xmlns:xsl="http://www.w3.org/1999/XSL/Transform" xmlns:msxsl="urn:schemas-microsoft-com:xslt" xmlns:SharePoint="Microsoft.SharePoint.WebControls" xmlns:ddwrt2="urn:frontpage:internal">
2     <xsl:output method="html" indent="no"/>
3     <xsl:template match="/" xmlns:asp="http://schemas.microsoft.com/ASPNET/20" xmlns:__designer="http://schemas.microsoft.com/WebParts/v2/DataView/designer" xmlns:SharePoint="Microsoft.SharePoint.WebControls">
4         <h1><xsl:value-of select="root/title" /></h1>
5     </xsl:template>
6 </xsl:stylesheet>
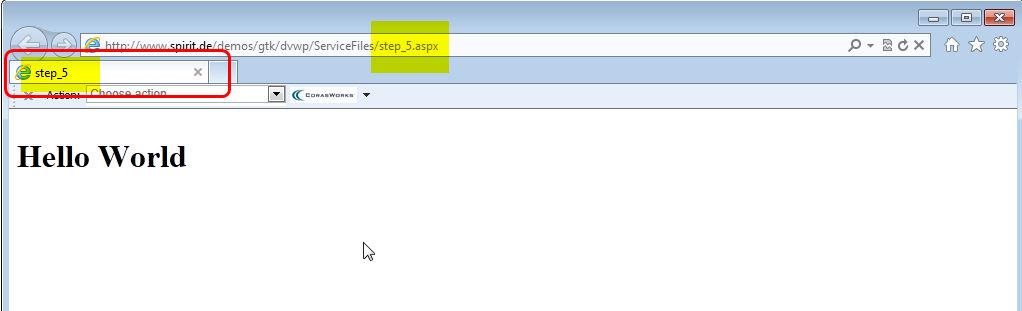
Assuming nothing went wrong, you should see something like this in your browser.
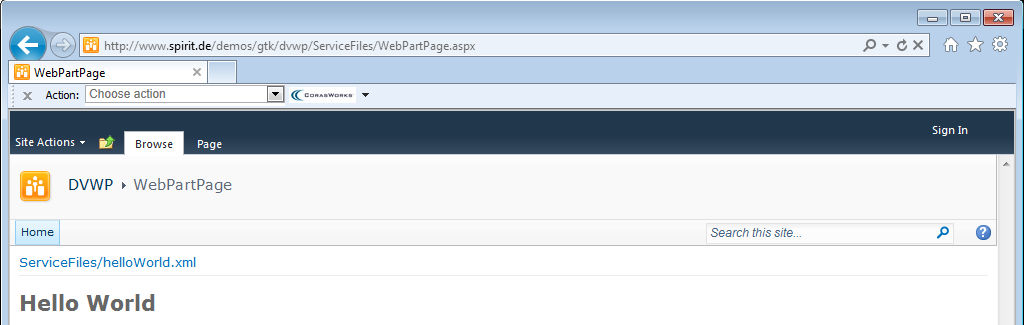
For your convenience you have access to the Source, see the rendered result Live and what’s more important you can see the HTML source of that page; and yes, right click on the rendered result, view source will work as well.
The size of HTML source will act as our baseline, and a quick look reveals that there are 772 lines of code, which includes our payload of <h1>Hello world</h1>. You can see that our payload is nicely integrated into a fully-fledged SharePoint theme. As said above this scenario is exactly, what the DVWP was built for.
Checkpoint In a series of small step-by-step modifications this starting point now undergoes optimization, with the goal of creating a slick HTML5 version that uses the same payload.
- Ready?
- 3
- 2
- 1
- go…
Step 1 Create an empty aspx page in the same folder (hint: right click is your friend) call it step_1.aspx and copy/paste the existing DVWP from WebPartPage.aspx into it.
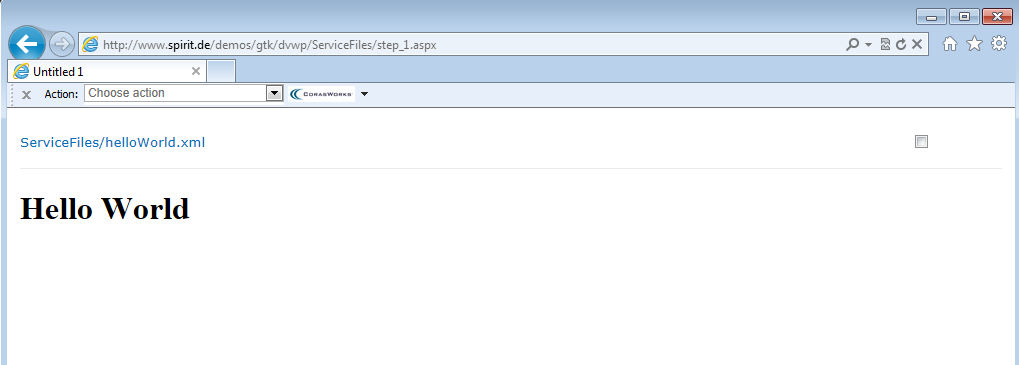
By placing the DVWP onto it’s own empty aspx page we a) removed almost all visible SharePoint chrome and b) reduced the HTML source size to 160 lines. Make a copy of the current page (step_1.aspx) and save as next page (step_2 .aspx); repeat the same process for the following steps.
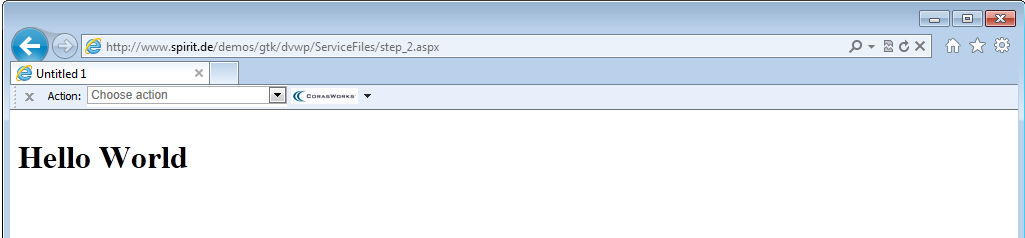
Step 2 Getting rid of the Web part properties bar is straight forward and frankly could have been done in our original page as well. Simply open the web part properties and change the Chrome Type to none, which will bring us down to 154 lines.
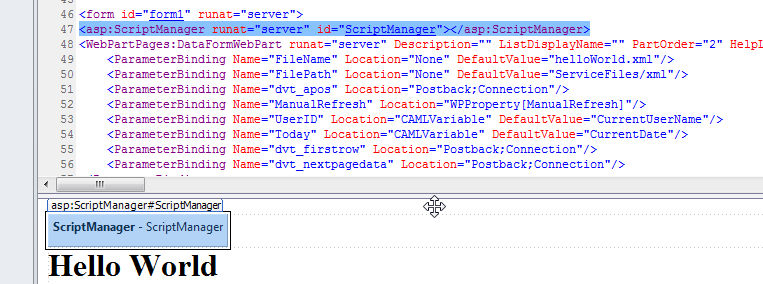
Step 3 After that easy passage in step 2 let’s get a little bit more aggressive by getting rid of the asp:ScriptManager tag. You can either delete it in the code view or in design view. If the latter, make sure that you’ve turned on Visual Aids otherwise you won’t see it.
You should test this modification immediately in the browser and you’ll see this error message.
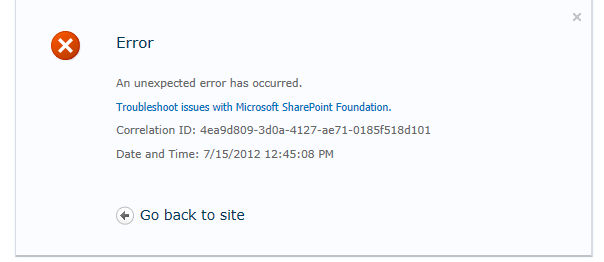
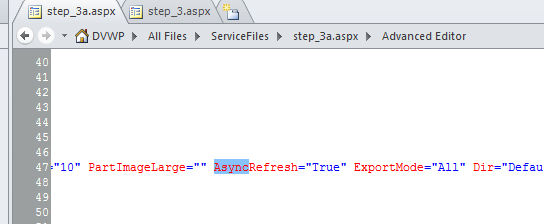
How comes? The page looks still good in SPD, doesn’t it? Somehow the web part seems to have a dependency on the asp:ScriptManager that only shows up in the browser. Being at this point before, you remember that the ScriptManager is responsible for loading all kind of JavaScript files, some of them Async in nature. So by carefully exploring the DVWP settings, you come across the following AsyncRefresh=True property. Modifying this to AsyncRefresh=False will ensure that the error message goes away and brings the html down to 124 lines.
Checkpoint Up till now we’ve used SPD to make modifications, but from this point on SPD is no longer your best friend for dealing with the DVWP. This is not the fault of SPD though; we are simply driving the DVWP behind the point that’s supported inside SPD. Therefore I’d suggest that you now grab your favorite XML/XSLT HTML editor and make further modifications directly in the source code.
One additional warning By making modifications beyond this point, you will no longer be able to save your site as a site template and create new sites from it, at least not reliable. Most of the time this is not an issue, remember we are going to build a Ferrari and you probably just need one not thousands ;-). But if there’s ever a need to move your Ferrari around, you can still manually copy the aspx pages or turn them into a Visual studio feature.
Step 4 Looking at the source code of the result in step 3 will immediately trigger our attention to the next optimization target. There is that huge input that hosts the viewstate. All nice and well if you are doing server side stuff, but we don’t want that, so simply remove the <form ...>and </forms> tags in the source.
Yeah, I know that might sound a little bit drastic, but give it a try before you judge; and you’ll be rewarded by seeing the HTML source cutting down to 51 lines.
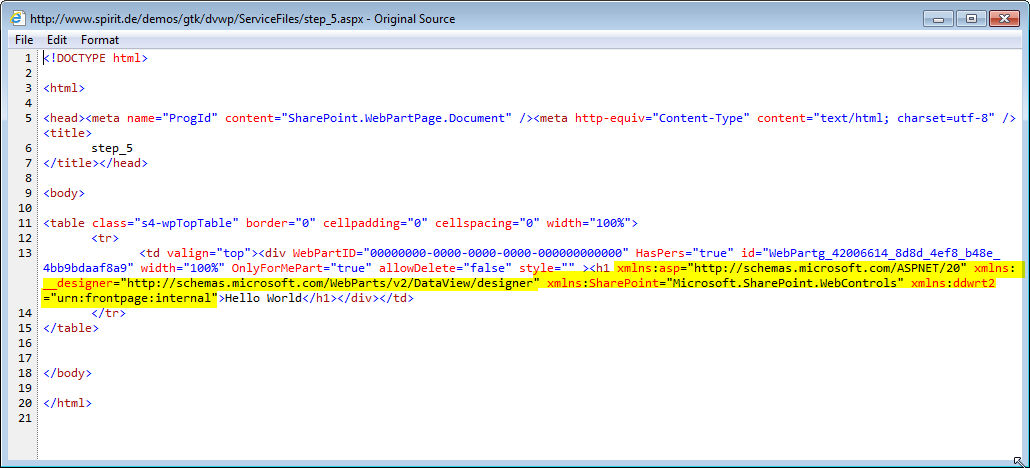
Step 5 Let’s see if we can still use some SharePoint controls at the server side after our drastic step 4; and in addition let’s cleanup the current header.
- change the static title to a dynamic one (see below)
- update the doctype
<!DOCTYPE html>and<html>tag - remove existing
<style>tag
1 <title><SharePoint:ListItemProperty Property="BaseName" maxlength="40" runat="server"/></title>`
As you can see below the <title> information is correctly showing the current’s page name; and by cleaning up we are down to 20 lines.
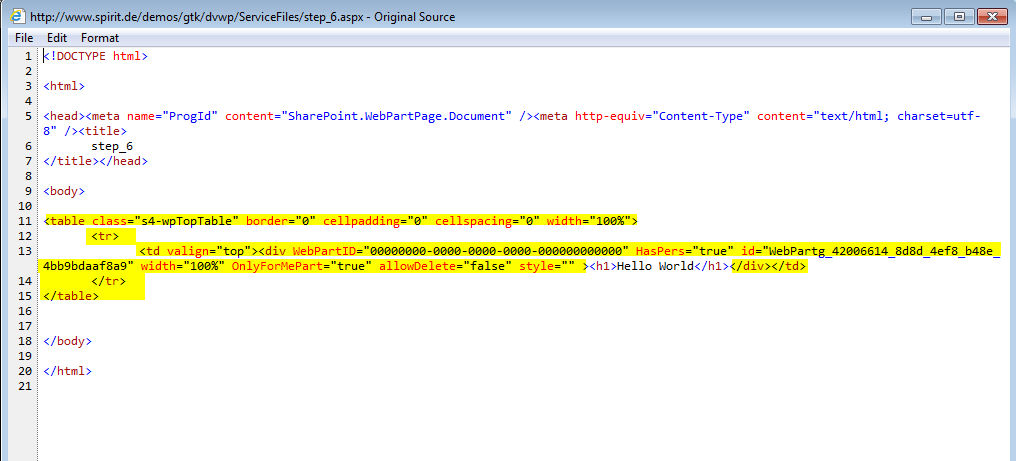
Step 6 Now have a look at the HTML5 source after all the optimization. Not too bad I’d say, but still there’s room for improvement. See the highlighted namespaces in the payload. This will be our next target.
Truth told, we might have tackled those namespaces earlier, but now that our HTML becomes smaller, it is far easier to spot that they are not required.
This one is pretty straight forward, just modify the XSLT slightly. Here’s the reformatted version that defines all exclude-result-prefixes correctly and removes the namespaces in <xsl:template match="/".
 1 <xsl:stylesheet version="1.0"
 2 exclude-result-prefixes="ddwrt asp __designer xsl msxsl SharePoint ddwrt2"
 3 xmlns:ddwrt="http://schemas.microsoft.com/WebParts/v2/DataView/runtime"
 4 xmlns:asp="http://schemas.microsoft.com/ASPNET/20"
 5 xmlns:__designer="http://schemas.microsoft.com/WebParts/v2/DataView/designer"
 6 xmlns:xsl="http://www.w3.org/1999/XSL/Transform"
 7 xmlns:msxsl="urn:schemas-microsoft-com:xslt"
 8 xmlns:SharePoint="Microsoft.SharePoint.WebControls"
 9 xmlns:ddwrt2="urn:frontpage:internal">
10     <xsl:output method="html" indent="no"/>
11     <xsl:template match="/">
12         <h1><xsl:value-of select="root/title" /></h1>
13     </xsl:template>
14 </xsl:stylesheet>
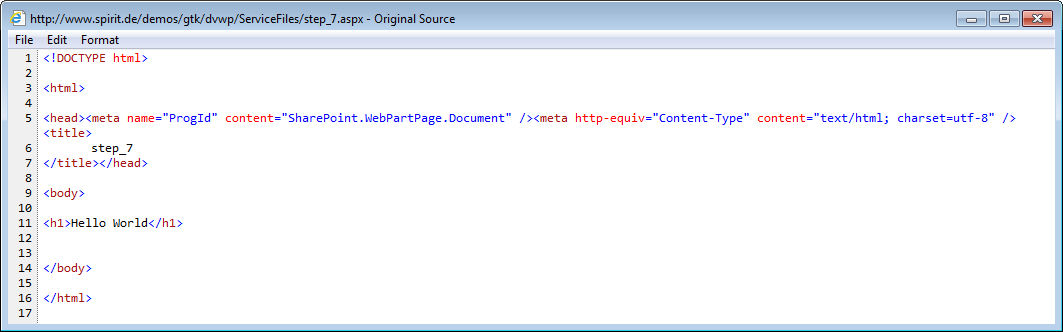
Step 7 Not much room for optimization left, correct? But there’s one thing that annoys me most, when looking at the current state of things. Take a look at our XSLT stylesheet above, there’s clearly NO <table class"....></table> in there, this code is injected by the DVWP instead.
The not that well known property SuppressWebPartChrome (see MSDN) will help us getting rid of this extra WebPartChrome. Please note that this only works if the DVWP lives outside a web part zone, so you can’t use this for standard implemenations like our initial WebPartPage.aspx.
You reach the finishing line by adding SuppressWebPartChrome="True" to the web part properties, which brings us to
16 lines of clean HTML5 code or The Ferrari version
Boy, that was probably just another TL;DR, but if you made it till here, you might have picked up one or two things about the DVWP that you’d consider ‘Good to know’.
I’d be glad to hear from you about the experiences you make, while testing this out.
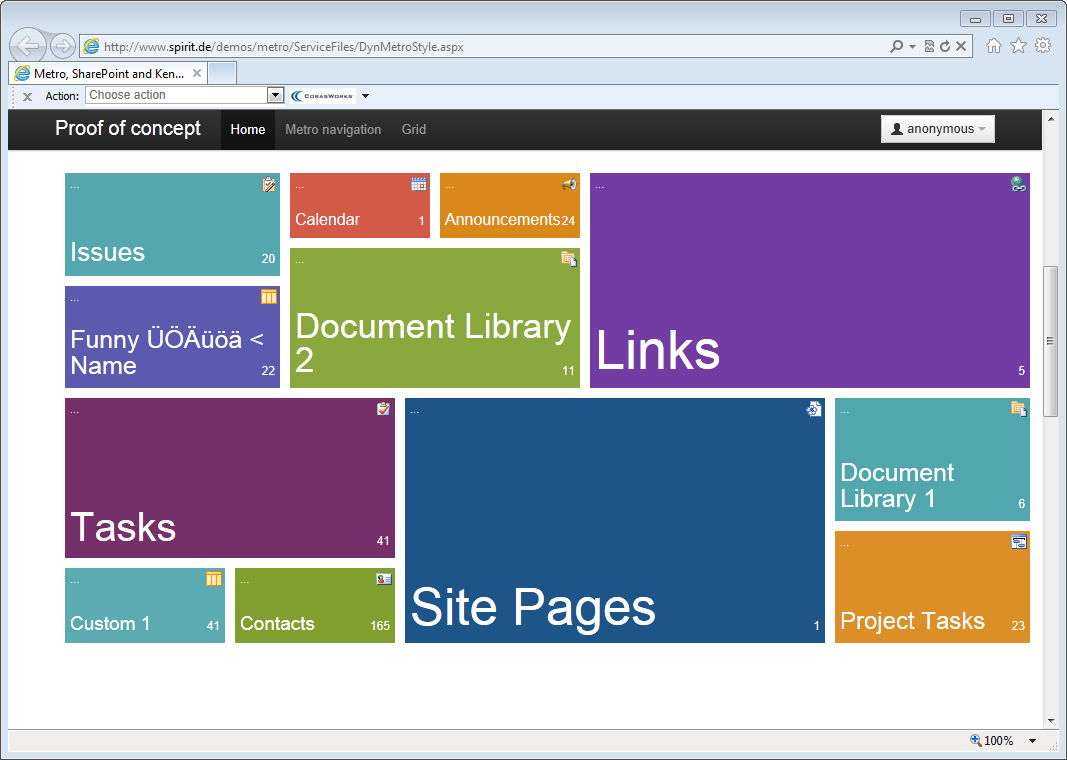
BTW if you are looking for inspiration, where to go from here, take a look at this Metro demo, which is a HTML5 client app that was build using two DVWPs…, but’s that’s worth another story, so stay tuned!