The SharePoint DVWP in Ferrari mode strikes again
In the last post we dissected the SharePoint DVWP up till the point where it delivered clean HTML5. If you remember I call this mode the Ferrari. Now the bad news: For those who like to cut things down to the bare bones, that’s it. You can’t dissect the DVWP any further.
Now the good news: For those who think that this would be great starting point to build something new, read on. In this post I’m going to show you my way of driving the Ferrari. Of course this is not the only way, so feel free to do something completely different… and give me your success stories.
First let’s ask ourselves some question:
- What are we going to build?
- Which technologies are we going to use?
- How to effectively use our
Ferrariin that scenario?
Answer to Q1: Let’s build a new version of the Metro style menu web part, that was initially build by Peter Collins. Hey Rainer, why would you do that? It’s already build, isn’t it? Yeah, you’re right, but we are going to add some visual effects and some configuration options to the picture, which wasn’t in the first version. Simply think of our version as V2.0.
Answer to Q2: A Ferrari needs to be driven in adequate places like the Nürburgring in Germany, so let’s try to find a technology stack that can cope with that ideal ;-).
Technologies:
- Accessing SharePoint data: DVWP in ferrari mode
- Providing a modern HTML5/CSS3/JavaScript Framework Zurb Foundation 3
- Metro styled live tiles by Drew Greenwell MetroJS
- Alternative for SergoiUI (the metro font) Open Sans Condensed
- Metro like icons by IconShock Free Metro Icons
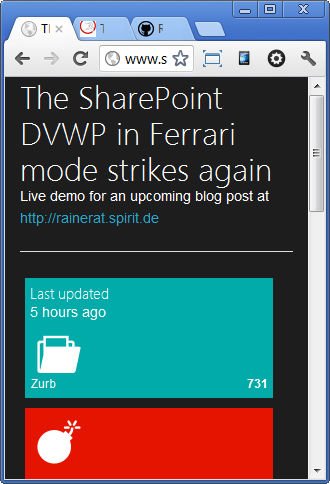
The reasoning behind each selection is simple: I like them. I know that there are alternatives at each level, but as said earlier it’s your decision entirely… when you build your solution. Now without further hesitation lets present two screenshots of the live demo. Thanks to some feedback I got on twitter from Marc D Anderson the second screenshot shows an optimized version for iPhones.
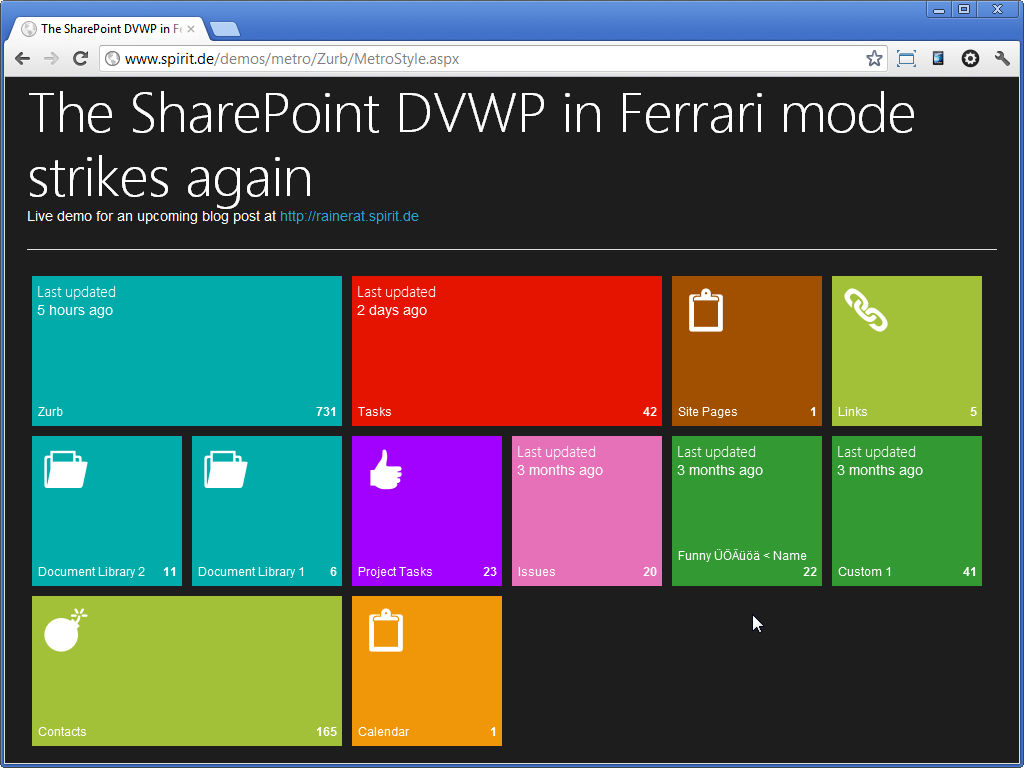
I encourage you to take a look at the live version first to see the live tiles in action. All kudos to Drew Greenwell’s MetroJS project.
Now let’s dive a little deeper into the code by looking at the Source. As you can see it’s almost the same minimal HTML5 that was introduced last time, enhanced by the files required by Zurb Foundation 3 and MetroJS.
Somewhere in the middle you see this div <div id="metroTiles">...</div>, where the DVWP is instantiated. If you are looking very closely, you spot some differences from where we left it last time. This time the web part properties are stripped down to the bare minimum and by using <XslLink>XSLT/ListsAsTiles.xslt</XslLink> we are allowed to store the XSLT in an external file. As in the Peter Collin’s version the DataSourceMode is set to ListOfLists in which the server returns information about all lists/libraries of the current site.
 1     <div id="metroTiles" class="twelve columns tiles">
 2         <!-- DVWP with DataSourceMode="ListOfLists" -->
 3         <WebPartPages:DataFormWebPart runat="server" AsyncRefresh="False" FrameType="None" SuppressWebPartChrome="True">
 4             <ParameterBindings></ParameterBindings>
 5             <DataFields></DataFields>
 6             <XslLink>XSLT/ListsAsTiles.xslt</XslLink>
 7             <Xsl></Xsl>
 8             <DataSources>
 9                 <SharePoint:SPDataSource runat="server" DataSourceMode="ListOfLists" SelectCommand=""
10                                          ID="dsLists"></SharePoint:SPDataSource>
11             </DataSources>
12         </WebPartPages:DataFormWebPart>
13         <!-- DVWP with DataSourceMode="ListOfLists" -->
14     </div>
I’m not going to talk about the Zurb Foundation 3 specific configurations here (sass and compass based), but from my first impression I can say at least so much: ”It’s hot! Real hot!”. A quantum leap compared to other prominent HTML5 frameworks. Don’t take my word on it, check it out on your own and let me know what you think.
Answer to Q3: This one is pretty short: Know your XSLT.
Checkpoint: Up till now you should have a rough understanding how the various pieces of the solution fits together. While it’s certainly not rocket science it’s nothing for beginners either. But now we are coming to the heart of the solution. We have to fine tune the Ferrari, so that it can deliver its best performance. You asked for it, so here it is:
A word of warning: I don’t want to waste your time, so there’s no need to read on, if you most likely never work with XSLT at all.
XSLT deep dive
XSLT might not be everybody’s darling, but let’s face it, you can do a lot of smart things in SharePoint with it that otherwise would require either third party tools or custom .Net development.
You have access to the complete XSLT at github and I’m going to provide some background information about the various pieces below. Of course that code only reflects my coding style. If you pick up one or another XSLT trick that you find useful, good. If not, there’s certainly more than one way to skin a cat, so I’d glad to hear from you about you’re tackling things instead.
BTW before you ask: My favorite book ever on that topic is Jenni Tennison’s XSLT and XPath On the edge.
With that here’s what makes the Ferrari engine tick. After the usual <xsl:stylesheet ..> declaration we start by defining a $Rows variable. It’s used to filter out list/libaries that you don’t want to render e.g. like those with (@__spHidden = 'True' and …
1 <xsl:variable name="Rows" select="/dsQueryResponse/Rows/Row[not(@__spHidden = 'True') and not(contains
2 (@__spDefaultViewUrl, '_catalogs')) and @__spTitle != 'ServiceFiles']"/>
One goal for the solution was to make it configurable. One of the easiest way to accomplish that is by defining a variable and access it via msxsl:node-set($VariableName). Here I’m using the global element to store global configuration options and tiles to store configuration options based on the BaseTemplate e.g. Contacts, DocumentLibrary and so on. As you can see there are options for color and icon, which control the visual appearance, but also options like data-mode and data-direction that will be used by MetroJS to provide the slide and flip animations.
In a fully fledged solution you’d store those somewhere externally and then bring them in either via Linked Data source, cookies, querystrings etc.
 1 <!-- configMap allows configuration per BaseTemplate -->
 2 <xsl:variable name="configMap">
 3     <global>
 4         <maxTiles>12</maxTiles>
 5         <wideTiles>3</wideTiles>
 6         <backTileTitle>Last updated</backTileTitle>
 7     </global>
 8     <tiles>
 9         <item BaseTemplate="Contacts" color="lime" icon="images/48/bomb.png"/>
10         <item BaseTemplate="DocumentLibrary" color="teal" icon="images/48/file.png" data-mode="slide"
11               data-direction="vertical"/>
12         <item BaseTemplate="GenericList" color="green" icon="images/48/inventory2.png" data-mode="flip"
13               data-direction="vertical"/>
14         <item BaseTemplate="Tasks" color="red" icon="images/48/bomb.png" data-mode="flip"
15               data-direction="horizontal"/>
16         <item BaseTemplate="GanttTasks" color="purple" icon="images/48/hand_thumbsup.png"/>
17         <item BaseTemplate="IssueTracking" color="pink" icon="images/48/clipboard.png" data-mode="slide"
18               data-direction="vertical"/>
19         <item BaseTemplate="Links" color="lime" icon="images/48/link.png"/>
20         <item BaseTemplate="WebPageLibrary" color="brown" icon="images/48/clipboard.png"/>
21         <item BaseTemplate="Events" color="mango" icon="images/48/clipboard.png"/>
22         <item BaseTemplate="unknown" color="blue" icon="images/48/smiley_sad.png"/>
23     </tiles>
24 </xsl:variable>
25
26 <!-- shortcuts to globalConfig and tilesConfig -->
27 <xsl:variable name="globalConfig" select="msxsl:node-set($configMap)/global"/>
28 <xsl:variable name="tilesConfig" select="msxsl:node-set($configMap)/tiles"/>
The next variable $itemInList stores a result set that it sorted descending by @__spItemCount. This in combination with $globalConfig/wideTiles will be used to show wide tiles based on the number of items in a given list or library e.g. $wideTiles = 3 would show the 3 lists with the most items as wide tile.
1 <!-- itemsInList sorted by @__spItemCount descending. Used to distinguish between normal and wide tiles  -->
2 <xsl:variable name="itemsInList">
3     <xsl:for-each select="$Rows">
4         <xsl:sort select="@__spItemCount" order="descending" data-type="number"/>
5         <item id="{@__spID}" count="{@__spItemCount}" pos="{position()}"/>
6     </xsl:for-each>
7 </xsl:variable>
The above variables are all globally defined, so they can be accessed throughout the code in every template. Next comes the root template and you can see that the result set is sorted by a heavy XPath expression. All we want to do here is having the lists/libraries sorted by the time they were last modified, but unfortunately the system buries the only reliable UTC date somewhere down in the @__spPropertiesXml attribute. I leave it up to you to digest this XPath and figure out what it’s exactly doing.
By checking <xsl:if test="position() <= $globalConfig/maxTiles"> before we call the Tile template we restrict the number of rendered tiles to whatever is configured, nothing fancy here.
1 <xsl:template match="/">
2 <xsl:for-each select="$Rows">
3 <!-- This complex sort criteria is required because __spModified is localized. Using information inside __spPropertiesXml instead -->
4 <xsl:sort
5 select="translate(substring-before(substring-after(@__spPropertiesXml, 'Modified="'), '" LastDeleted'), ' :', '')"
6 order="descending" data-type="number"/>
7 <xsl:if test="position() <= $globalConfig/maxTiles">
8 <xsl:call-template name="Tile"/>
9 </xsl:if>
10 </xsl:for-each>
11 </xsl:template>
The Tile template is responsible for building up the tile html, but as you can see this is divided into multiple separate templates. I simply follow common sense here that mixing structure and logic will become unmaintainable very soon. So we build up a helper variable $t using the MetaData template (logic), which is passed to the TileTemplate (html). Think of this template as your dispenser: logic -> left, structure ->right.
 1 <xsl:template name="Tile">
 2     <!-- Mashup of $configMap and $ itemsInList for the current item -->
 3     <xsl:variable name="coreMetaData">
 4         <xsl:call-template name="MetaData">
 5             <xsl:with-param name="baseTemplate" select="@__spBaseTemplate"/>
 6             <xsl:with-param name="spID" select="@__spID"/>
 7             <xsl:with-param name="spPropertiesXml" select="@__spPropertiesXml"/>
 8         </xsl:call-template>
 9     </xsl:variable>
10     <!-- shortcut for accessing $coreMetaData -->
11     <xsl:variable name="t" select="msxsl:node-set($coreMetaData)"/>
12
13     <xsl:call-template name="TileTemplate">
14         <xsl:with-param name="t" select="$t" />
15     </xsl:call-template>
16 </xsl:template>
Alright prime time; we are building the required html that represents one tile. We start by copying the tile html from the MetroJS page. There are multipe variable that you can access here.
$Rowsattributes can be accessed directly e.g.<xsl:value-of select="@__spItemCount"/>ordata-target="{@__spDefaultViewUrl}".- Meta data can be accessed through
$twith the same ease as e.g.<div class="live-tile {$t/item/@color} {$t/size}"or<img src="{$t/item/@icon}" class="micon"/>. - You’ve access to everything that was globally defined like e.g
$globalConfig.
 1 <xsl:template name="TileTemplate">
 2     <xsl:param name="t" />
 3     <div class="live-tile {$t/item/@color} {$t/size}"
 4          data-stops="100%"
 5          data-speed="750"
 6          data-delay="-1"
 7          data-mode="{$t/item/@data-mode}"
 8          data-direction="{$t/item/@data-direction}"
 9          data-target="{@__spDefaultViewUrl}"
10          data-baseTemplate="{@__spBaseTemplate}">
11         <span class="tile-title">
12             <xsl:value-of select="@__spTitle"/>
13             <span class="badge right">
14                 <xsl:value-of select="@__spItemCount"/>
15             </span>
16         </span>
17         <div>
18             <img src="{$t/item/@icon}" class="micon"/>
19         </div>
20         <div>
21             <h3>
22                <xsl:value-of select="$globalConfig/backTileTitle" />
23             </h3>
24             <span class="prettyDate" title="{$t/prettyDate}">
25                 <xsl:value-of select="$t/prettyDate"/>
26             </span>
27         </div>
28     </div>
29 </xsl:template>
The last template builds a mashup based on the current item’s $tilesConfig. Think of it as multiple tables that are joined by some common keys e.g. $tilesConfig/item[@BaseTemplate = $baseTemplate]. Here we use the @__spBaseTemplate attribute of the current Row, which was passed in as baseTemplate param as the join criteria for $tilesConfig/item/@BaseTemplate. If there’s a match we make a copy of the matched $tilesConfig/item if not we copy $tilesConfig/item[@BaseTemplate = 'unknown'] instead.
Everything that needs to be calculated like <size> and <prettyDate> goes in this template as well. If the logic for a given calculation would become to complex you should factor it out of course.
1 <xsl:template name="MetaData">
2 <xsl:param name="spID"/>
3 <xsl:param name="baseTemplate"/>
4 <xsl:param name="spPropertiesXml"/>
5 <!-- accessible via $t/item/@XXXX. Available attributes see $configMap/tiles/item/@XXXX -->
6 <xsl:choose>
7 <xsl:when test="$tilesConfig/item[@BaseTemplate = $baseTemplate]">
8 <xsl:copy-of select="$tilesConfig/item[@BaseTemplate = $baseTemplate]"/>
9 </xsl:when>
10 <xsl:otherwise>
11 <xsl:copy-of select="$tilesConfig/item[@BaseTemplate = 'unknown']"/>
12 </xsl:otherwise>
13 </xsl:choose>
14 <!-- accessible via $t/size -->
15 <size>
16 <xsl:choose>
17 <xsl:when test="msxsl:node-set($itemsInList)/item[@id = $spID]/@pos <= $globalConfig/wideTiles">
18 <xsl:text>wide</xsl:text>
19 </xsl:when>
20 <xsl:otherwise/>
21 </xsl:choose>
22 </size>
23 <prettyDate>
24 <xsl:variable name="DateRaw"
25 select="translate(substring-before(substring-after($spPropertiesXml, 'Modified="'), '" LastDeleted'), ' ', 'T')"/>
26 <xsl:value-of
27 select="concat(substring($DateRaw, 1, 4), '-', substring($DateRaw, 5, 2), '-', substring($DateRaw, 7,2), substring($DateRaw, 9), 'Z')"/>
28 </prettyDate>
29 </xsl:template>
That’s it, you made it. You’ve seen how to build a modern HTML5/CSS3/JavaScript solution in SharePoint 2007/2010/(2013?) using the good old DVWP. And you know that at its core it’s powered by 134 lines of XSLT.
As always feedback welcome and bye for now.